Logo Magzmaker


Media manager

Photos, videos, and documents are managed in the Media Manager, where you can upload and position them on your pages. Access the Media Manager through:

  1. Edit Mode:

    • Open directly via the image block while building or editing your page. This is useful for adding or replacing images. Learn more about this process here.
  2. Side Menu:

    • Navigate through: My Magzmaker > Manage > Media Manager. Use this method to adjust settings for previously uploaded images or to upload and store files for future use. You can also delete files that are no longer needed.

Caution: Be cautious when deleting files. Removing a file that is currently used on a page will also eliminate it from that page.

Kopje capuchino


Upload files

Uploading a file while editing a page

  1. Access Media Manager:
    • While in edit mode, you can directly access the Media Manager from any content block.
      • For a new block: Click + Add block and select Image or Video.
      • For existing blocks: Open the edit screen via the icon.   
  2. Upload or Replace File:

    • In the edit screen, click the purple button Add Media (or click Remove first if replacing a file).

    • Click Choose File at the top, browse to the file on your computer, and click Open to upload it to the Media Manager.

Uploading a File via the Side Menu

  1. Open Media Manager:

    • Navigate through My Magzmaker > Manage > Media Manager.
  2. Add Media:

    • Click the purple button + Add Media and select the type of file to upload: Image, Video, or Document.
  3. Upload File:

    • Click Choose File, locate the file on your computer, then click Open to add it to the Media Manager.

Supported File Types and Size Limits

You can upload one file at a time to ensure efficient management and integration of media into your projects.

  1. Images:

    • Maximum Size: 12 MB
    • Allowed Types: PNG, GIF, JPG, JPEG
  2. Videos:

    • Maximum Size: 64 MB
    • Allowed Type: MP4
    • Note: Videos can be large, often exceeding 300 MB, which may slow down page loading or playback. To optimize video files for online use while maintaining quality, consider using online tools like xconvert.com/compress-mp4.
      Note: alternatively hosting videos on YouTube is recommended for better performance and less disk usage.
  3. Documents:

    • Allowed Types: PDF, DOC, DOCX, TXT, RTF, PPT, PPTX, XLS, XLSX
    • After uploading a document, copy its link by right-clicking the file name and selecting "Copy Link Address." This link can then be assigned to text within the text editor or inserted into a content block's link field.

By adhering to these guidelines, you can ensure your files are compatible and perform optimally within your publications.

Settings for Uploaded Photo

When uploading images to the Media Manager, there are specific settings you can configure:

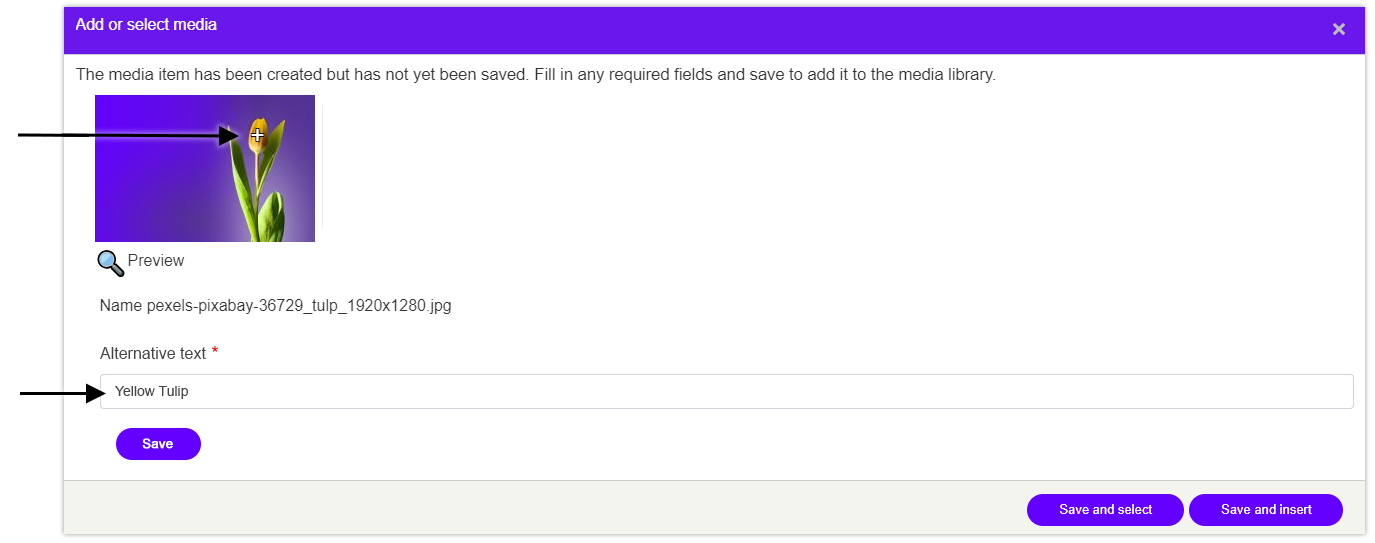
  1. Alt Text:

    • Purpose: Enter an alt text for each image. This is required and helps enhance SEO by providing search engines with clear information about the content of the image.
    • Usage: Alt text can also serve as a caption in photo albums. This option can be enabled within the settings of the respective content block.
    • Editing: To adjust alt text at any time, navigate to My Magzmaker > Manage > Media Manager and click on the pencil icon  next to the image to access and modify the settings.
  2. Focal Point:

    • Setting the Focal Point: Optionally, set the focal point of an image by moving the white cross to the center of the main subject in the photo. This is crucial for ensuring that when the image is resized, this point remains centered.
    • Adjustments: If you need to change the focal point later, go to My Magzmaker > Manage > Media Manager and click on the icon   to modify the focal point.
    •  Limitation: The focal point setting is effective only in the Image content block. It does not apply to images used in sliders, as background images for pages or sections, or as page thumbnails.

These settings ensure that your images are optimized for both functionality and SEO, enhancing the visual appeal and accessibility of your content.

Media manager set alt-text and focal point

In this example of a photo with a yellow tulip, the tulip is on the far right in the original file. By setting the focal point specifically on the yellow button of the tulip, you ensure that this part of the image remains centrally focused in every aspect ratio. This technique is particularly useful when the image is displayed across different devices and orientations, maintaining the tulip as the focal center, thus preserving the visual impact regardless of how the image is cropped or resized.

Preview focuspunt bij verschillende beeldverhoudingen

Example of focus point at different aspect ratios

Modifying or delete

ing a file in Media Manager

If you need to update or remove a previously uploaded image, including its alt text or focal point, follow these steps:

Modifying an Image

  1. Access the Media Manager:

    • Navigate to My Magzmaker > Manage > Media Manager.
  2. Modify Settings:

    • Click on the pencil icon next to the image   you wish to edit.
    • Alt Text: Update the alt text as needed and click Save. Remember, alt text can also function as a caption in photo albums such as Slider and Masonry. If the caption update isn't appearing, reselect the image and save again to refresh.
    • Focal Point: Adjust the focal point by dragging the '+' icon to the desired part of the image to ensure it remains the visual center in varying aspect ratios. Click Save after adjustments.

Deleting an Image

  1. Remove the Image:
    • Click on the trash can icon next to the image.
    • Click Delete at the bottom of the screen to permanently remove the image.

Important Note

  •  Be Cautious: If the image is actively used on any page, deleting it from the Media Manager will also remove it from those pages. Confirm its usage across the site to prevent unintended content loss.