Logo Magzmaker


Inserting and Editing Text on a Page

  • Adding a Text BlockIf your page is empty, start by adding a section. Within this section, you can then add a Text Block. For guidance on adding sections, refer to the section management instructions. 

  • Editing Existing Text: to edit text already on the page, click on the pencil icon next to the relevant Text Block and choose 'Edit'.

Letters AAA


Adding and Editing a Text Block

To add new text or edit existing text on a page:

  1. Enable Edit Mode:

    • Navigate to the page where you wish to add or edit text. Ensure the page is in edit mode by clicking 'Back to editing' in the purple bar at the top. This will display the section guidelines on the page.
  2. Add or Edit Text:

    • Hover over a section to reveal the + Add block button. Click it and select Text block from the options.
    • Once the block is added, an edit screen with a text editor will open.
  3. Inputting Text:

    • Type directly into the editor or paste text using CTRL-V. Note that while pasting removes most unwanted formatting, some may still carry over. For completely clean text, first paste into Notepad to strip all formatting, then paste again into the Magzmaker text editor.
  4. Formatting Text:

    • Utilize the text editor’s tools to format your text as needed, adjusting font, size, color, and more.

By following these steps, you can effectively manage text content, ensuring it is presented clearly and professionally within your publication.

Editing text

In the text editor, you can format text using tools on the top bar. Here's how to apply common formatting options: 

  1. Basic Formatting:
    •  Select the text and apply bold, italic, underline, or bullet points directly from the toolbar.
  2. Headings:
    • Highlight the desired text, then select a format (Normal, Heading 1, Heading 2, etc.) from the Format dropdown. The font, size, and color of headings are pre-set in the edition-settings, which you can read more about in the section on Fonts en textstyles.
      Changing the font (available only with a Magzmaker Professional subscription) is explained later on this page.
  3. Links:
    • To create a link, select the text and click the link icon  on the toolbar above the text editor. The edit screen for the link will now open.
    • External link: Paste the URL in the URL field. It opens in a new window by default. Optionally, enable an icon to appear next to external links  .
      This option is switched off by default. Check on page Editions under Settings how to enable this 

      Internal link: Paste either the full URL or just the specific part (e.g., /editionname/pagename). Internal links open in the same window, but you can set them to open in a new tab via the Advanced settings in the link edit screen: check Open in new window/tab at the bottom.
  4. Formatting links:
    • Links inherit the general text color by default. You can manually set a color or underline by selecting the link text and choosing options from the toolbar. In the editor, links are displayed in blue for clarity. Select the link text and choose underline from the top bar, or assign it a color or style from the Style dropdown (these are the Editor styles; see the paragraph below).
  5. Style Customization: 
    • To color text or apply specific styles, select the text and pick options from the Style dropdown. Stylyes like Uppercase or Text shadow can be combined, such as applying white color + uppercase + text shadow.
  • Using icons: via the icon  you can add icons to your text.
    In the edit screen that opens, type the name of an icon you are looking for in the Icon-Name-fa field. For example, arrow, email, flag, search, LinkedIn, etc. You will then see suggestions. In the description above the Icon-Name-fa field, there is a link to the font-awesom icon list or an overview and the names of the icons.
    Some icons have two variants; one completely black   (regular)
    . By default, the solid icon is used. If you want the regular variant, open Additional Font Awesome Settings and choose Regular under Style.
Inserting an Image into Text

To enhance your text block with an image:

  1. Select a location for the image:

    • Place the cursor where you want to insert the image. Click the image icon  from the toolbar above the text editor. This action opens the Media Manager.
  2. Select or Upload Image:

    • Choose an existing image from the Media Manager or upload a new one by selecting the appropriate option.
  3. Insert and Customize Image:

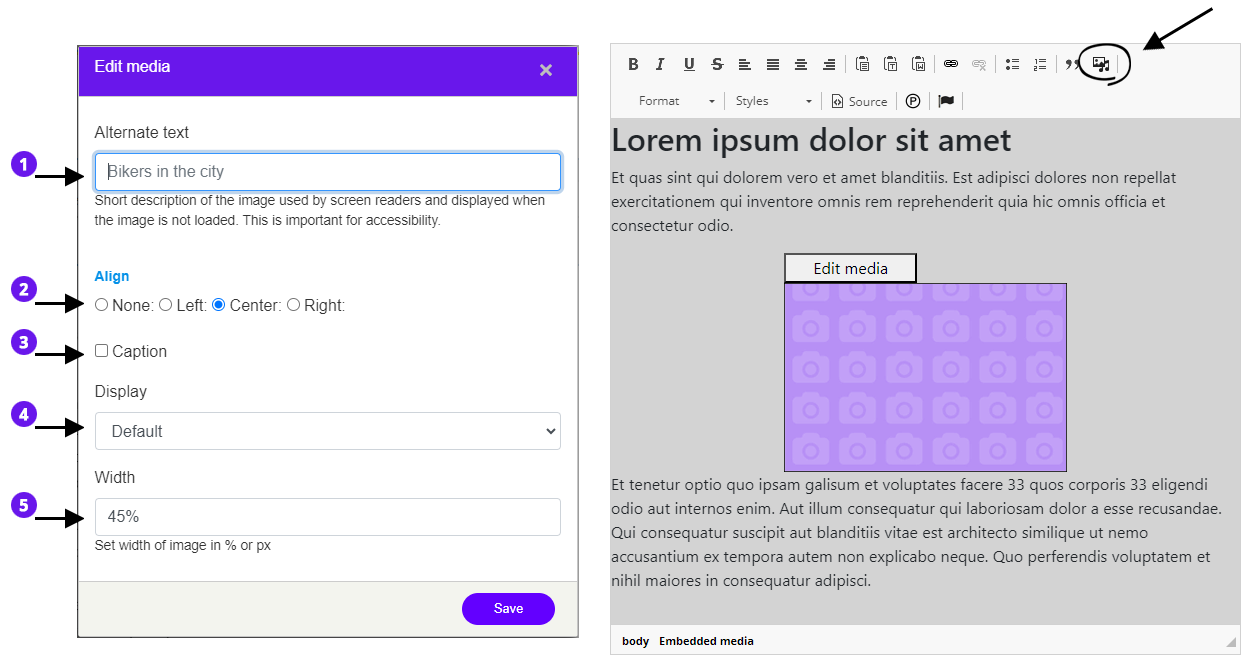
    • After selecting an image, it will be placed within the text editor. To adjust its size and position, click 'Edit media' located above the image. Here, you can set how the text wraps around the photo, ensuring it integrates smoothly with your content.


Tekstblok met afbeelding met tekstomloop

Add image via text-editor

Editing Media Settings

When you add an image to your text, you have several options to customize its appearance and placement:

  1. Alternate Text:

    • Displays the alt text you entered in the media manager, which is important for SEO and accessibility.
  2. Align:

    • Choose the image alignment within the text:
      • None: Image stays in line with the text as it flows.
      • Left: Aligns the image to the left, allowing text to wrap around the right.
      • Centered: Centers the image on the page.
      • Right: Aligns the image to the right, allowing text to wrap around the left.
  3. Caption:

    • Check this option if you want to include a caption with your image. Enter the caption text below the image after checking this box.
  4. Display:

    • Select the size of the image:
      • Default: Uses the image’s original dimensions.
      • Portrait, Landscape, or Square: Crops the image to the chosen aspect ratio.
  5. Width:

    • The width is set to 45% by default, allowing for text wrap if aligned left or right. Adjust this setting based on your layout needs.
  6. Mobile Display:

    • At a breakpoint of 768 pixels (typically for mobile devices), the image automatically displays at 100% width to optimize viewing on smaller screens.

These settings enable you to effectively integrate images into your text blocks, enhancing the visual impact and readability of your content.

Manage Editor Styles in Magzmaker

Editor styles are predefined CSS formats set during your magazine's installation, often reflecting your corporate identity colors. Here’s how to manage these styles based on your subscription:

Professional Subscription: Creating or Editing Styles

  1. Access Styles:

    • Navigate to the dashboard and select 'Editor-styles' from the side menu.
  2. Modify Style Order:

    • The styles appear in the same order as they do in the text editor’s Style dropdown. To reorder, drag a style with  to a new position and click 'Save' to confirm the changes.
  3. Edit CSS Definitions:

    • In the CSS definition field, modify existing styles as needed.
  4. Change Style Name:

    • Click on the style name to edit it. Note: Changing the name will unlink the style from any text previously formatted with the old name, causing it to revert to default formatting.
  5. Create a New Style:

    • Click 'Add css item' at the top of the page.
    • Enter a title for the style and specify the CSS in the definition field, e.g.:
      .classname { 
      color: #ff0000;

      }

Publisher Subscription: Requesting Styles

  • Users with a Publisher subscription can't create or edit CSS styles themselves. If updates to the corporate identity colors or other styling changes are needed, Publisher subscribers can request new styles or modifications to existing ones. To make a request, issue a support ticket detailing the desired changes or new styles needed for your publication.

General Note

  • Remember, styles are universal across all editions. Any modifications to a style will update the appearance of content across all editions where the style is applied.

These tools allow Professional and Publisher subscribers to effectively customize and manage the presentation of their content in Magzmaker.

Fonts

If there is a custom corporate font, it is often already set up during installation. Users with a Professional subscription can enable a different font or upload their own font. Users with a Publisher subscription can request a font change if, for example, the corporate font changes.

  • Go to the My Magzmaker dashboard.
    Under the ADMIN menu item, various font options are available:
    Manage fonts: to set up the available Google Fonts in Magzmaker.​​​​​​​
    Custom fonts: When you have your own font, you can upload the files here.​​​​​​​
    Adobe font-script: a link to a web project created in Adobe Fonts.
Google fonts
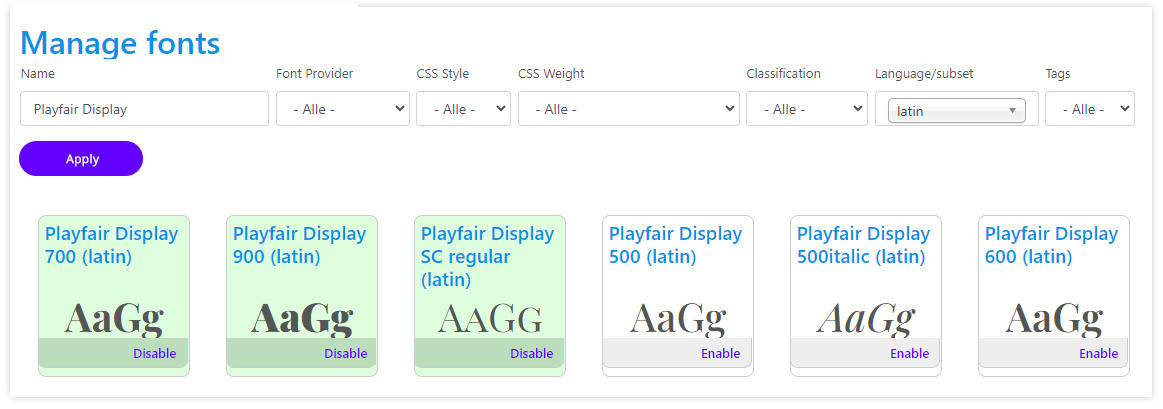
  • Choose Manage fonts: You will now see an overview of fonts, with the selection of Google Fonts enabled by default.The green-colored fonts are enabled. These are available to set in the Magazine and Edition settings. The other available fonts are white.
  • Add new Google font: Scroll through the font overview or type the name of a font you are looking for in the field at the top and click the purple Apply button.
    To make the font available, click enable under the font; the font will now turn green..
Manage Google fonts


  • Apply new font: click on the font in the green enabled font.
    On the page that now opens you will see the CSS of the enabled font.


    font-family: 'Playfair Display';
    font-style: normal;
    font-weight: 700;

    You can copy the name that appears with the font family (in this example Playfair Display) without the brackets. Go to the Edition settings of the edition whose font you want to change and paste Playfair Display into the field of the heading you want, e.g. the Heading H1.
     
    Afbeelding
    Edition settings - set font
     
  • In the Edition settings (and the Magazine settings) you will see various options under the dropdown at font-weight (including normal, bold and different numbers indicating a thickness). It depends on the font which option belongs to it, you can also see this in the piece of CSS that you have opened by clicking on the green enabled font (700 in this example).
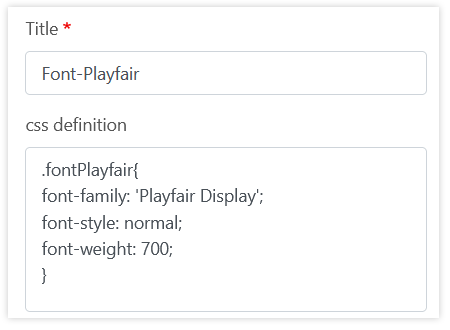
  • Using the font in an Editor style: want to create a style in the Editor styles with the new enabled font. Then copy the entire piece of CSS that you have opened by clicking on the green enabled font.


    font-family: 'Playfair Display';
    font-style: normal;
    font-weight: 700;

    And create a new style as described above
Editor stijl

Custom font
  • Here you can upload your own font. The file must be a .woff file. Woff is a font extension for online use.After uploading your file, you will see an overview of custom fonts.
  • Click Enable to activate the font.
  • Click View Font to see the CSS of the enabled font.

    font-family: 'NaamFont';
    font-style: normal;
    font-weight: 700;


    Applying the font: You can copy the name listed next to font-family (in this example, FontName) without the quotes. Go to the Edition Settings of the edition where you want to change the font and paste FontName into the field of the heading you want, e.g., Heading H1.

    Using the font in an Editor style: If you want to create a style in the Editor Styles with the new enabled font, copy the entire CSS snippet that you opened via
    View Font.
Adobe font script

If you have an Adobe Creative Cloud subscription, you can use Adobe fonts. After choosing the desired font and font styles, you can create a web project by clicking </> Add to web project at the top right of the font styles and give the project a name. A link will be generated that you can use in the magazine.
For example: <link rel="stylesheet" href="https://use.typekit.net/gis5cdw.css">
Read more about creating a web project on this Adobe page..

When adding a font to an Adobe web project, the CSS associated with the font is shown. This is useful to save so you can use it when setting the font in Magzmaker or if you want to create text styles in Magzmaker. For example:

Sofia Pro Bold
font-family: "sofia-pro", sans-serif;
font-weight: 700;
font-style: normal;

Or open the Adobe web project > click on Edit Project and view the settings for the font.

Adobe font script voorbeeld Sofia bold

  • Open Magzmaker via the side menu My Magzmaker > ADMIN > Adobe font script. Paste the link created in the web project into the Body field. Click save.
     
  • To apply the font in an edition, adjust the font settings in the Edition Settings. If you want to use the font in all subsequent editions, also adjust the font settings in the Magazine Settings (Professional subscription only). Go to the Edition Settings via the purple button next to the edition in the edition overview or via the purple bar at the top of a page.
     
  • Use the name in the font field as it appears in the example used in font-family, paying attention to capitalization. In the above example CSS, it is sofia-pro. To specify whether it is light, regular, or bold, place the value as shown in the example CSS in the font-weight field. In the example, it is 700.
Editie-instellingen aanpassen met fontnaam uit Adobe font script

  • To create a CSS style with the font from Adobe Font Script, use the entire piece of code

    .nameOfYourStyle {
    font-family: "sofia-pro", sans-serif;
    font-weight: 700;
    font-style: normal;
    }

    Learn more about text-style in the section about this