Logo Magzmaker


Editions

My magzmaker > Manage > Editions

  • An edition in Magzmaker serves as a container where pages are added. The edition's name is part of the URL format: domainname.com/editionname/pagename
  • To include an edition in the kiosk, check the box next to it in the edition overview.
    • Note: In the kiosk, the name of the first page (the cover) is displayed, not the edition name. 
  • The most recently created edition (at the top of the overview) appears prominently in the kiosk, while older editions are shown in a smaller format. To reorder editions in the kiosk, drag them using the icon on the Editions overview page. Remember to confirm any changes by clicking the purple Save button at the bottom of the page.
Macrons

Copy Edition

copy an existing edition


Editing an Existing Edition

  • Click on 'Editions' in the side menu
  • Click on the edition you want to edit from the list
  • Click on the page you wish to edit.

For more details on editing a page, refer to the section titled Edit page

Creating a new edition

  • Click on editions in the side menu.
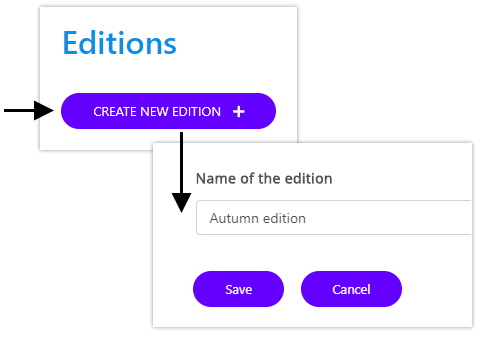
  • Click on "+ Create new edition" at the top.
  • Enter a name for the edition.
      The edition acts as a container in which you will add pages.
  • Once the edition is created, you can begin adding pages.

For more information on adding pages, refer to the Pages and templates section.

New edition

Edition settings

In the edition settings, you can customize the font (for body text and headings H1-H6), adjust font sizes, upload your own logo, and choose different colors for the menu bar and overlay menu.

Each edition has its own edition settings.
In Magzmaker, the house style settings—such as colors, fonts, logos, and menu options—are defined in the magazine settings. These settings serve as the default when you create a new edition (but not when copying an edition). After creating an edition, these defaults become the edition settings.

You can modify these edition settings for the specific edition, including using different fonts or colors for the menu. These changes will not affect other editions or the main magazine settings.

    Accessing Edition Settings

    You can access the edition settings from multiple locations:

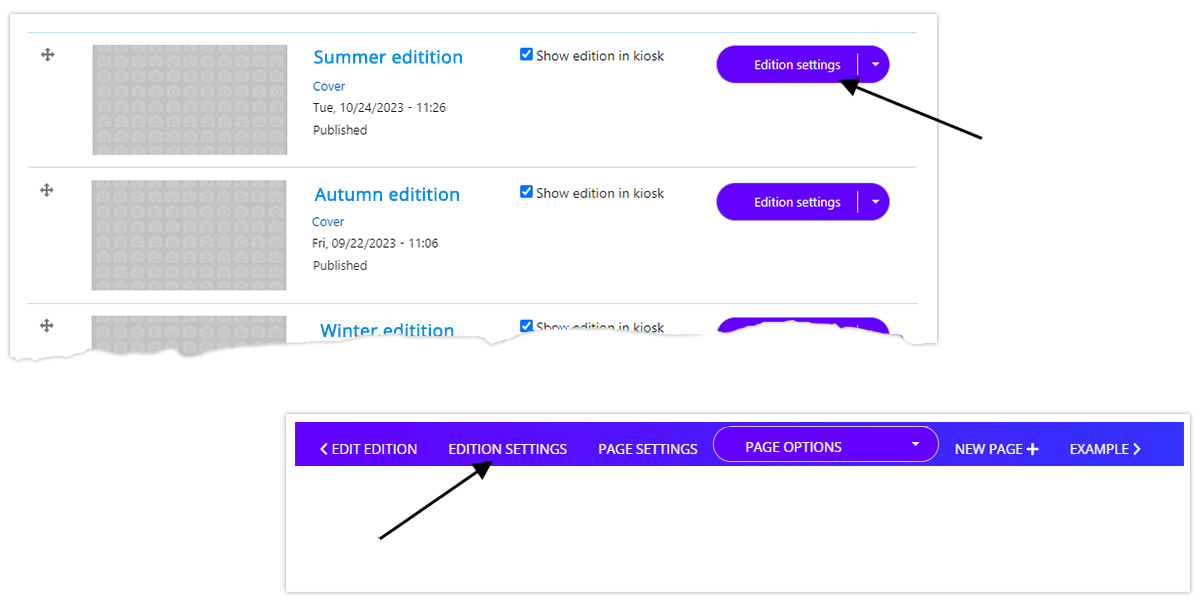
    • From the Dashboard: Click on 'Editions' in the side menu. In the edition overview, click on the purple button next to the relevant edition.

    • While Editing a Page: Access the edition settings directly by clicking the 'Editions Settings' button in the purple bar at the top.

    Edition settings buttons

    Elements of the Edition Settings

    Menu and logos

    Expand this section to adjust logos and colors

    Menubar

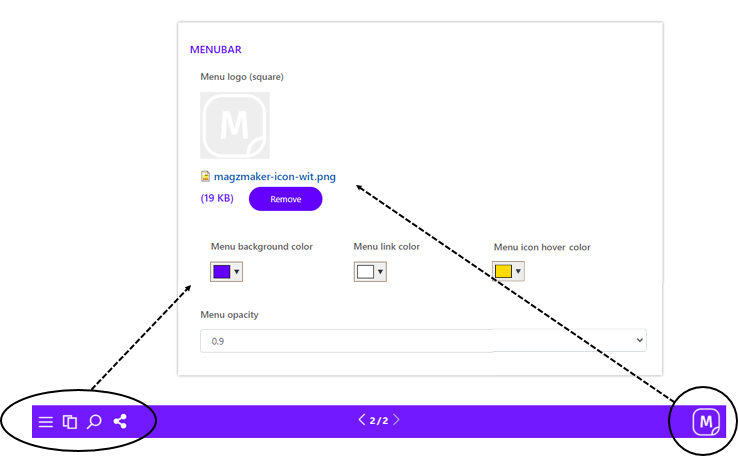
    • Logo/Image: You can set the logo or image that appears at the bottom right of the menu bar. Use a square-format image (PNG, GIF, JPG, JPEG). Leave this empty if you prefer not to display a logo in the menu bar.
    • Colors and transparency of the menu bar
      • Menu Background Color: Choose the color of the bar at the bottom of the menu.
      • Menu Icon Color: Set the color of the icons on the menu bar
      • Menu Icon Hover Color: Define the color of the icons when hovered over or clicked.
      • Menu Transparency: Adjust the transparency level. Set it to 1 for full color or lower it (e.g., 0.8) for a semi-transparent effect, allowing the page content to be visible through the menu when scrolling.
    Edition Settings - set menubar icons

    Menu Overlay
    The menu overlay opens when you click on  (hamburger menu icon) at the bottom left of the menu bar. You can add a logo to appear at the top of the menu overlay. The colors for the menu overlay are configured similarly to the menu bar, including the background color, text color, and text hover color.

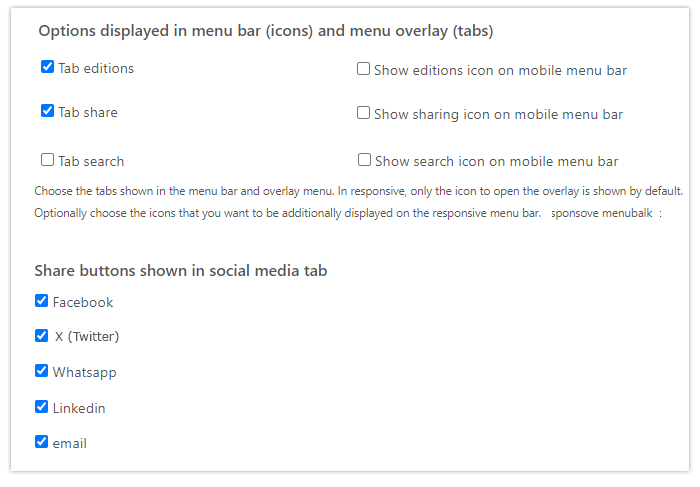
    Options shown in Menu Bar and Menu Overlay
    The hamburger icon   is always displayed in the menu bar to open the menu overlay.

    When you open the menu overlay, the Pages tab is displayed by default, showing the pages of the current edition. This tab is always active and cannot be disabled.

    • The Editions tab displays other editions from the publication that are set to "Show in Kiosk."
    • The Search tab contains search functionality.
    • The Contact tab, currently in development, will display a small contact form.

    You can choose which tabs you want to display. The options you select will appear as icons in the menu bar and as tabs in the menu overlay.

    Mobile Display
    On mobile devices, only the hamburger icon is shown by default. However, you can choose to display additional icons on mobile.

    Search Functionality
    If you enable the Search option in the menu bar and menu overlay, users can search through all editions placed in the kiosk. Editions not in the kiosk will not appear in the search results.

    Share Buttons
    You can specify which share options you want to include. These will appear in the menu overlay under the Share tab.

    Edition Setttings: Set tabs in menu overlay

    Fonts and text styles

    To access and adjust fonts and text styles:

    1. Open the Edition settings via the purple bar at the top of your page or from the edition overview.
    2. Expand the Fonts and Text Styles section.

    Here, you can adjust the settings for text and headings specific to the edition you are working on. Changes made here will not impact other editions.

    Note: If you want to adjust fonts and text styles for all future editions, make these changes in the Magazine settings. All new editions will then use the updated magazine settings as their default.

    Font settings
    The default font settings are typically sufficient. However, some fonts may appear too large or too small. In such cases, you can adjust the font size accordingly.

    • Font Family: This is the name of the font. For custom house style fonts, this is usually set during the initial setup. Users with a Professional subscription can enable or upload a different font. For more information about fonts, refer to the relevant section. Users with a Publisher subscription can request font adjustments, such as changes to align with corporate identity.

    • Font Size: Font size can be set using various units:

      • Pixels (px): A fixed unit.
      • Percentage (%), em, vw: Scalable units that adapt better when text is resized on the screen.
    • Responsive Font Size: Set as a percentage of the original font size.

    • Line Height: Adjusted as a percentage of the font height.

    • Font Weight: Adjusts the thickness of the font, depending on the capabilities of the selected font.

    • Color: You can set the color for body text and headings here. This color can be overridden in the text editor using a different text style.

    Set icon for external link   

    Below the field for setting the font family of the general (paragraph) text, you will see a checkbox labeled Link Icon. If this checkbox is selected, this icon  will appear next to all external links in the edition. This setting can be customized for each edition individually.

    Edition Settings - icon-external-link

    SEO

    In the edition settings, you have the option to control whether your edition should be indexed by search engines. Indexing involves registering the pages with search engine databases to ensure they appear in search results.

    • Default Setting: The indexing option is enabled by default. This is because, typically, you would want the pages of your edition to be discoverable through search engines. All published pages within the edition will be indexed when this option is selected.

    • Opting Out of Indexing: There may be instances where you do not want your edition's pages to appear in search engine results. For example, if the content is intended exclusively for your employees. In such cases, you can uncheck the indexing option to prevent indexing.

    • Accessibility of Non-Indexed Pages: It's important to note that unchecking the indexing option does not restrict access to the pages. If someone knows the URL, they can still access the page directly. This setting simply removes the pages from search engine visibility.

     Publish

    To publish all the pages in your edition simultaneously:

    1. Click on the dropdown arrow located next to the edition.
    2. Select Publish All Pages from the dropdown menu.

    For more detailed information and further instructions, please refer to Publish page.